

Families
View all active cases
Casket Inventory
Stock levels & records
Documents
Forms library & paperwork
| COTC # | Deceased | Department | Date | Contractee | By |
|---|---|---|---|---|---|
| No FSC records yet. | |||||
📑 COTC SOP Manual — Directory
Click any SOP to open it. Click again to close. Only one SOP open at a time.
Handling of Medico-Legal, Suicide & Unnatural Death Cases
To establish an absolute, legally compliant protocol for the logistics, intake, security, holding, and documentation of deceased individuals whose deaths are classified as unnatural, violent, suspicious, or identified as a suicide. This SOP guarantees absolute compliance with Philippine laws, specifically protects mortuary practitioners from criminal liability, and prevents the destruction or contamination of state evidence.
All operations under this SOP are strictly bound by the following Philippine statutes:
This procedure applies universally to all personnel employed by Chapel of the Chimes Gegato-Abecia Inc., including first-call responders, transport teams, logistics staff, licensed embalmers, funeral directors, and executive administrative officers.
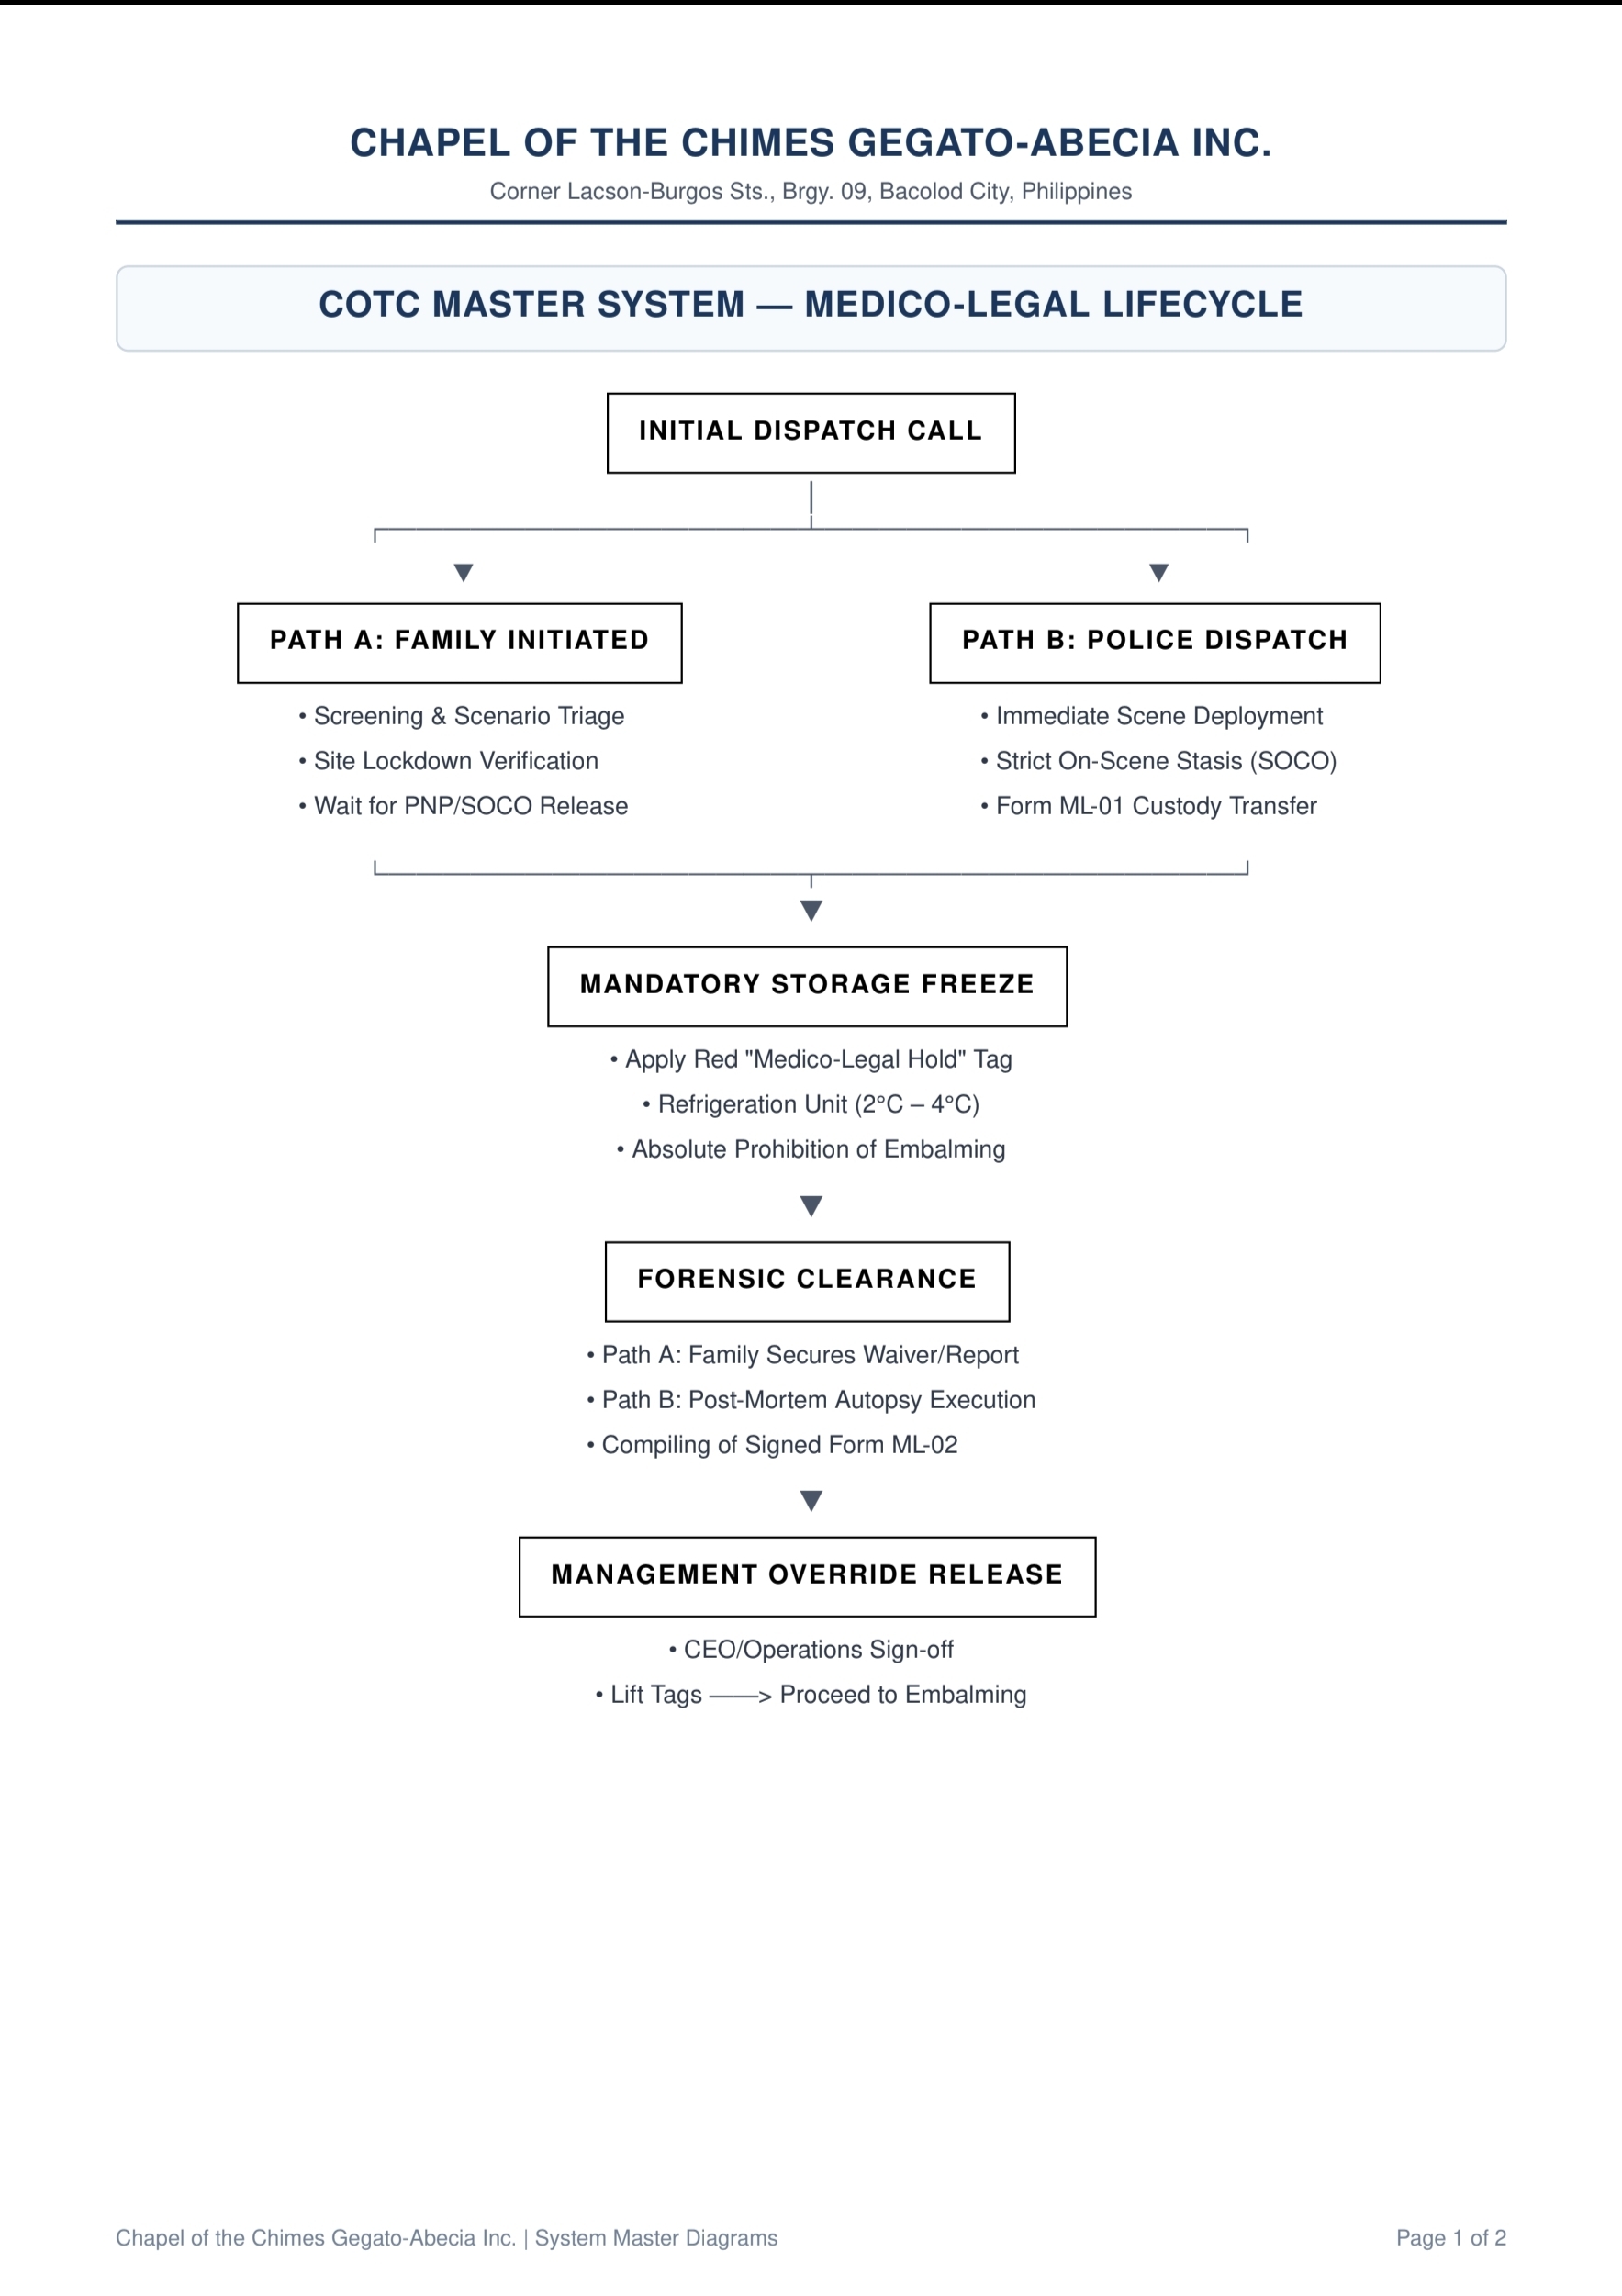
- 5.1 · First Call & Field Intake Verification. The Intake Officer must ask explicit questions about circumstances of death. If terms such as "hanging," "shooting," "poisoning," "sudden collapse," "overdose," or "accident" are used, the case must be instantly flagged as a Medico-Legal Case. Transport is strictly prohibited from entering a scene or moving a body until the PNP/SOCO have officially processed the site and issued a physical Clearance for Release of Remains. If a body is brought directly by family from a non-clinical setting, refuse immediate handling and notify police.
Path A (Family Calls): Interview, flag, verify PNP/SOCO lockdown before dispatch. Path B (Police Calls): Law enforcement call IS the clearance — deploy transport immediately to given coordinates. - 5.2 · Receiving & Mandatory Security Tagging. Issue and complete Form ML-01: Medico-Legal Case Log & Intake Record . Attach a physical Red Plastic Tag marked "MEDICO-LEGAL HOLD" to the right ankle and exterior handle of the stretcher. (Red color is an internal COTC convention. PNP MC 2014-006 requires identification tagging but does not specify color; the red tag exists to make hold-status visible at a glance.) Transfer immediately into the Mortuary Refrigeration Unit at 2°C–4°C to minimize decomposition without altering structural evidence.
- 5.3 · Absolute Prohibition of Embalming — Hold-Order Status. No incisions, arterial injections, cavity aspiration, or washing with specialized setting chemicals. Pre-embalming photography is strictly restricted to documenting existing wounds or traumatic indicators for internal legal records only — never shared or leaked. Only standard clothing or shroud layout is permitted if requested for immediate legal identification by the legal next of kin.
- 5.4 · Document Verification & Clearance Tracking. The Hold-Order remains active until the Head Embalmer or Operations Manager obtains, authenticates, and files physical copies of: Official PNP Blotter or SOCO Investigation Receipt; Official Autopsy Report signed by PNP/NBI Medico-Legal Officer (or a formal Autopsy Waiver from the local Government Health Officer); and the Medical Certificate of Death signed by a government-accredited physician.
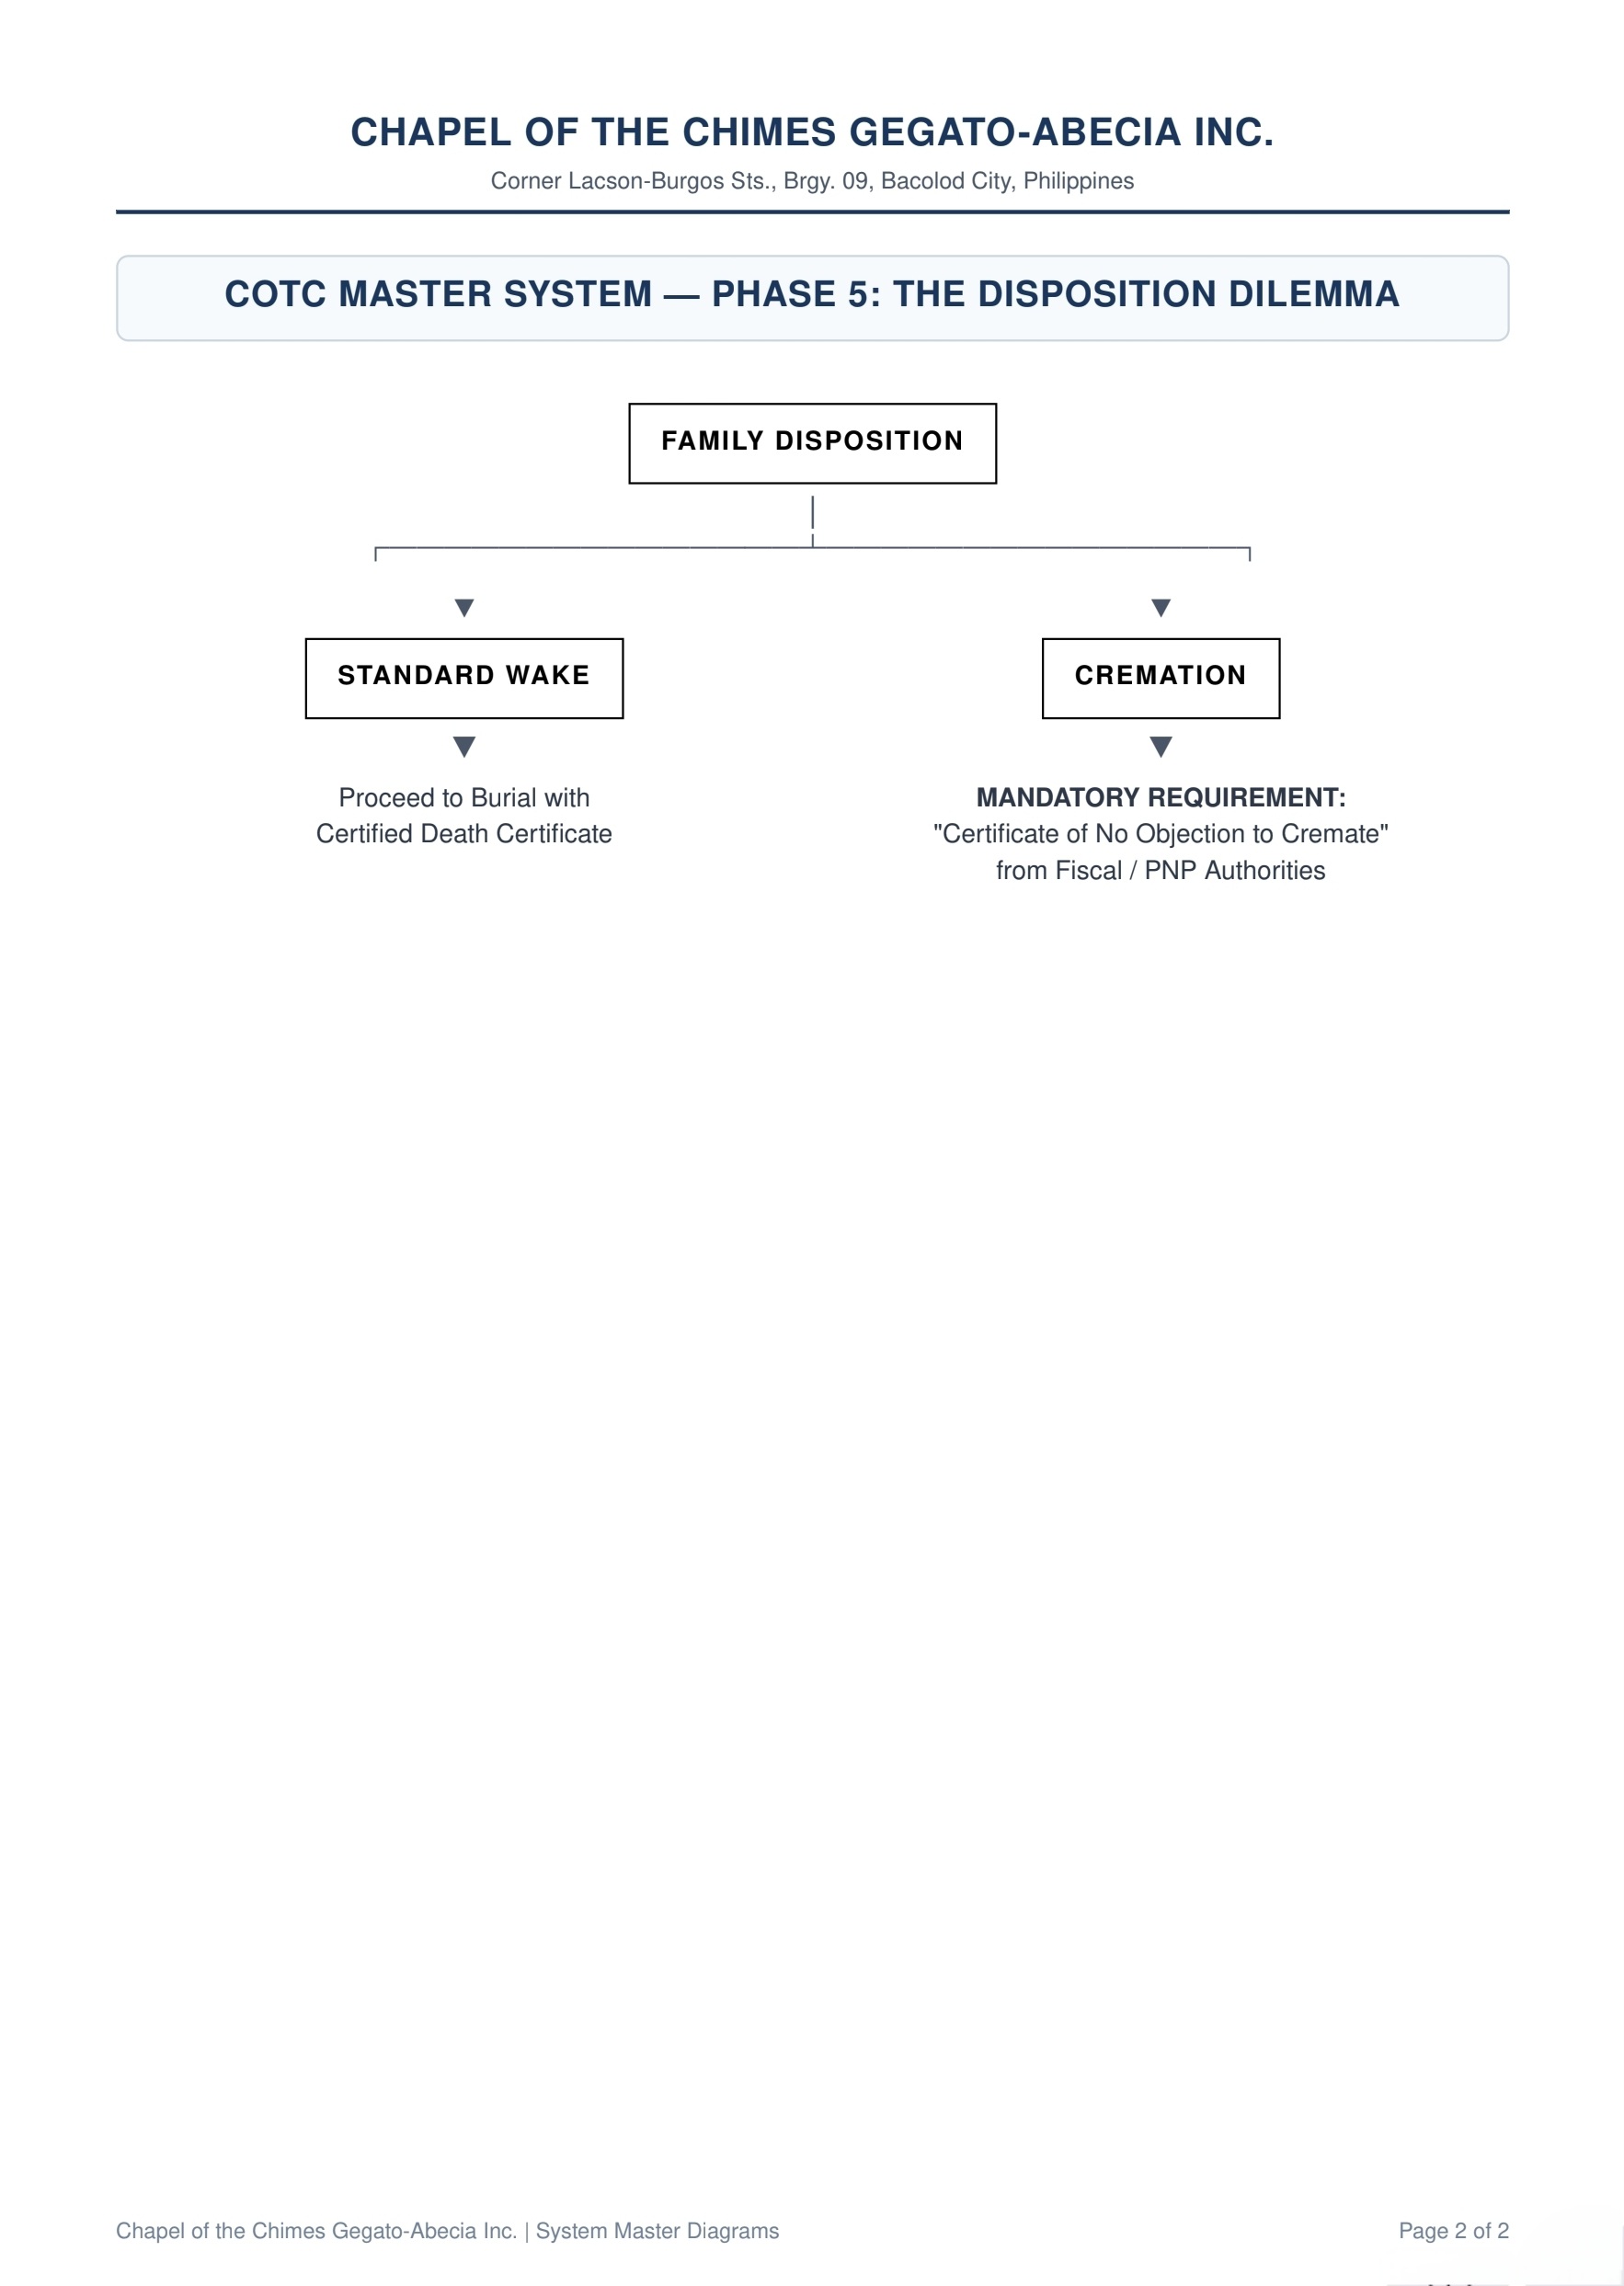
Path A: Family holds full legal & financial burden to secure PNP Blotter and Local Health Autopsy Waiver. Path B: COTC accommodates the forensic surgeon for on-site autopsy or handles loop transit to the PNP crime lab. - 5.5 · Handling Cremation Requests. If the family requests cremation for a confirmed or suspected suicide/unnatural case, the Crematory Operator is strictly prohibited from scheduling based on a standard death certificate alone. The funeral home must demand and receive an explicit Certificate of No Objection to Cremate issued by the inspecting Provincial/City Fiscal or the investigating PNP authority. (This is the LGU-administrative form documenting the prosecutor/PNP clearance required under PD 856 Chapter XXI IRR for medico-legal cremation cases.) Cremation permanently eradicates any possibility of future exhumation or toxicology testing — this document is non-negotiable.
- 5.6 · Authorization to Lift Hold & Proceed. Once all legal documentation is cataloged, the Operations Manager reviews and countersigns Form ML-02: Document Clearance & Hold Release Authorization. Only upon physical signing may the licensed embalmer proceed with regular restoration, chemical preparation, and casket integration.
Flow: Audit file copies → CEO/Ops Manager signs Release Block → Red Tag Removed → Chemical Embalming Commences
Any employee found violating this protocol, bypassing documentation checks, or executing unauthorized preparation steps on an un-cleared medico-legal case will face:
- Instant termination of employment.
- Referral to the Professional Regulation Commission (PRC) for license revocation.
- Immediate reporting to the PNP for criminal prosecution under PD 1829 (Obstruction of Justice).
- PNP Blotter Report
- Official Autopsy Report — or signed Autopsy Waiver from local government health officer
- Signed Medical Certificate of Death
- Signed physical Turnover Receipt or Field Clearance from investigating officer
- Form ML-01 (police unit name, badge number, incident report reference code)
- Form ML-02 — Executive Release (signed by CEO or Operations Manager)
- Certificate of No Objection to Cremate from City Fiscal (if cremation requested)
Standard First Call & Cadaver Pickup
To receive notifications of body arrivals, safely dispatch a team, and transfer the deceased to COTC with proper documentation and dignity.
All intake officers, dispatch coordinators, and transport team members.
- SOP: Medico-Legal & Unnatural Death Cases
- SOP: Body Transportation — Inter-facility & Cemetery Delivery
- SOP: Handling Personal Belongings of the Deceased
- Receive the call. Collect immediately: full name of deceased, exact address/location, cause of death (if known), contact person name and phone number, time of death. Record — do not rely on memory.
- Check for legal hold. If the death is violent, unnatural, or suspicious — follow the Medico-Legal SOP first. Do not dispatch until you confirm there is no active police investigation requiring the scene to remain undisturbed.
- Confirm team and vehicle availability. Assign at least two staff members. Verify the vehicle is fueled and fully equipped: stretcher, body bag, gloves and full PPE, cadaver release form.
- Dispatch team. Provide the team with the exact address and contact person. Confirm ETA with the family before departing.
- On-site: Identify and obtain release. Verify identity of deceased with the responsible party. Have the next-of-kin or authorized person sign the cadaver release form. For natural death with an attending physician — request the Death Certificate or physician's declaration.
- Transport to chapel. Handle with care and dignity. Keep the body covered during transport. Upon arrival, log the intake with the preparation room and transfer to the duty embalmer.
- Enter in COTC system. Create a new case on the First Call page. Enter all collected information immediately. Assign the case to the appropriate staff member.
- Signed cadaver release / authority-to-transport form (from next-of-kin)
- Physician's declaration or Death Certificate (for natural deaths)
- Police / NBI release order (if unnatural death — see Medico-Legal SOP)
Chapel Assignment & Room Setup
To assign, prepare, and maintain chapel rooms to ensure families receive a dignified and well-organized viewing experience.
Funeral directors and chapel maintenance staff.
- SOP: Client Intake & Documentation
- SOP: Funeral Service Preparation
- SOP: Payment Collection & SOA Issuance
- Check chapel availability. Open the Chapel Board in COTC to see which chapels are occupied and for how long. Confirm the family's expected interment date to estimate the duration needed.
- Assign chapel in SOA Builder. Select the chapel in the case's SOA Builder. Saving the SOA automatically syncs the assignment to the Chapel Board — no separate update is needed.
- Inform the family. Notify the family of the assigned chapel number and the cadaver transfer schedule. Provide the chapel address and any access instructions.
- Prepare the room. Clean the chapel thoroughly before the family arrives. Set up chairs, lighting, guest book, and flower stands. Verify the aircon/fan is working and the restroom is clean and stocked.
- Coordinate cadaver transfer. Confirm the estimated transfer time with the preparation team. Transfer happens only after embalming and dressing are complete.
- Post-interment chapel reset. After the family departs, clean the chapel and remove all items left behind. Clear the chapel assignment in the system so the board shows it as available.
Preparation Room — Cadaver Intake
To ensure every cadaver entering the preparation room is properly received, assessed, and assigned — maintaining accountability and readiness for preparation.
Preparation room staff, licensed embalmers, and transport team.
- SOP: Body Preparation & Preservation
- SOP: Embalming Procedures
- SOP: Handling Personal Belongings
- SOP: Medico-Legal & Unnatural Death
- Receive and verify. Receive the cadaver from the transport team. Verify identity against the signed release form. Log intake date, time, and receiving staff name.
- Initial condition assessment. Assess state of the body: decomposition level, injuries, skin condition, trauma, post-autopsy incisions. Note anything that will affect preparation or the family's viewing expectations.
- Secure personal effects. Remove and inventory all personal effects (jewelry, wallet, phone, etc.). Return to the family or lock in designated secure storage immediately. Have the family sign an acknowledgment receipt for returned items.
- Assign to duty embalmer. Formally assign the case to the duty embalmer. The embalmer signs the intake form acknowledging receipt.
- Brief the embalmer on special requirements. Communicate: family's preferences for dressing/clothing, any known religious or cultural practices, severity of trauma or discoloration, and special requests (e.g., extended viewing timeline, clothing provided by family).
- Coordinate clothing and casket. Confirm with the family what clothing the deceased will wear. Verify the assigned casket is ready and accessible in the preparation room.
- Notify when ready for chapel transfer. After embalming, dressing, and casketing are complete, notify the chapel team and the family of the expected transfer time.
Body Transportation — Inter-facility & Cemetery Delivery
To ensure the safe, dignified, and legally compliant transfer of remains between facilities — hospital to chapel, chapel to cemetery, or chapel to crematorium.
All transport/logistics staff, drivers, and the funeral director coordinating the transfer.
- SOP: Standard First Call & Cadaver Pickup
- SOP: Burial / Cremation Permit Processing
- Receive the transportation request. Log origin, destination, contact person, scheduled time, and case number in the dispatch system. Confirm with the funeral director that all required documents are ready before dispatch.
- Prepare the vehicle. Inspect the hearse/transport vehicle before departure. Confirm: stretcher, body bag, ID tag, PPE kit, and disinfectant supplies are on board. Fuel check mandatory.
- Two-person team minimum. All transfers require at least two staff members. Both must wear gloves and PPE during loading and unloading.
- Verify identity before loading. Cross-check the ID tag on the remains against the case paperwork. Have the sending facility or family representative sign the transfer logbook before the body is moved.
- Transport with dignity. Keep the body covered at all times during transport. Drive safely and deliberately — avoid sudden stops. Never leave the vehicle unattended while remains are inside.
- Delivery documentation. At the destination (cemetery, crematorium, or receiving facility), obtain a signed delivery receipt and record the time of arrival and condition of remains. Surrender the Burial Permit to the cemetery at time of interment.
- Post-transfer disinfection. Disinfect the vehicle interior, stretcher, and all contact surfaces after every transfer. Log the disinfection in the vehicle maintenance record.
- Transfer logbook (signed by sender and receiver)
- Burial Permit (for cemetery transfers)
- Case file with matching ID tag
Body Preparation & Preservation
To prepare the deceased with dignity and professionalism, meeting health and safety standards, and presenting the remains appropriately for viewing and interment.
Licensed embalmers and preparation room staff.
- SOP: Embalming Procedures
- SOP: Preparation Room — Cadaver Intake
- SOP: Medico-Legal & Unnatural Death
- SOP: Equipment Cleaning & Disinfection
- Pre-preparation assessment. Review the case file before touching the remains. Confirm embalming clearance is on file. For medico-legal cases, verify Form ML-02 is signed. Note decomposition level, trauma, skin condition, and post-autopsy incisions.
- PPE setup. Before entering the preparation room: wear gown, double gloves, face shield, and boots. No exceptions — even for brief contact.
- Initial body cleaning. Wash the external surface of the body with an approved disinfectant solution. This is both hygienic and a preliminary assessment step to check condition clearly.
- Positioning and feature setting. Set facial features (eyes, mouth) and position limbs before rigidity sets in or embalming solution is introduced. Align hands properly for casket placement.
- Preservation. Refrigerate at 2°C–4°C while awaiting embalming clearance if applicable. Once cleared, proceed to full embalming per the Embalming Procedures SOP. Apply topical preservatives for surface areas if extended refrigeration is needed.
- Dressing and cosmetics. Dress the deceased in family-provided clothing. Apply cosmetics per the family's instructions and the deceased's normal appearance. Manage viewing expectations honestly if trauma or discoloration limits restoration.
- Final presentation and casketing. Transfer to the assigned casket. Verify the ID tag matches the case file. Arrange any religious or personal items per family instruction. Notify the chapel team and funeral director that the case is ready for transfer.
- Area cleanup. Disinfect all preparation surfaces, instruments, and drains after each case. Dispose of biohazard waste per the Equipment Cleaning & Disinfection SOP. Log the cleanup.
Embalming Procedures
To perform chemical preservation of remains safely, in compliance with PRC licensing requirements and Philippine law, ensuring the body is suitable for viewing.
PRC-licensed embalmers only. No unlicensed staff may perform or assist with arterial or cavity work.
- SOP: Body Preparation & Preservation
- SOP: Medico-Legal & Unnatural Death
- SOP: Staff Safety & Biohazard Handling
- Pre-embalming authorization. Confirm authorization is in place: For standard cases, verbal or written family consent is sufficient. For medico-legal cases, Form ML-02 must be physically signed by the Operations Manager or CEO. Do not proceed without this.
- PPE preparation. Full PPE is mandatory before any contact: gown, double gloves, face shield, apron, and closed-toe boots. Check that the preparation room has adequate ventilation before working with chemicals.
- Initial body inspection and documentation. Document all existing wounds, marks, discoloration, and physical condition before starting. Photograph for internal records if trauma is present. This protects COTC from post-service complaints about damage.
- Arterial embalming. Inject embalming solution into the arterial system via the carotid or femoral artery. Use appropriate embalming solution concentration based on the condition of the body. Monitor fluid distribution and tissue firmness throughout.
- Cavity embalming. Aspirate and treat the thoracic, abdominal, and pelvic cavities with cavity fluid. Seal the trocar puncture after aspiration is complete.
- Restorative treatment. Address discoloration, swelling, sunken features, or traumatic injuries as needed. Use wax, filler, or cosmetic application appropriate to the level of trauma. Communicate openly with the family about realistic outcomes.
- Final cleaning and dressing. Wash the surface post-embalming. Apply cosmetics per family instruction. Dress in family-provided clothing. Place in casket and verify ID tag matches case file.
- Post-embalming documentation. Record in the case file: chemicals used (product name, concentration, volume), embalming duration, observations, and embalmer's name and PRC license number. This is a legal requirement under PRC regulations.
- Embalmer's PRC license (must be valid and on display)
- Form ML-02 signed by CEO/Ops Manager (for medico-legal cases only)
- Family consent (for standard cases)
- Post-embalming documentation log entry
Client Intake & Documentation
To receive bereaved families with compassion while ensuring all legal, contractual, and service documentation is completed accurately from the very first meeting.
Funeral directors and intake officers conducting the family meeting.
- SOP: Payment Collection & SOA Issuance
- SOP: Chapel Assignment & Room Setup
- SOP: Death Certificate Filing
- Initial reception. Receive the family in the private intake area. Offer condolences sincerely. Offer water or a seat. Begin the conversation at the family's pace — do not rush through forms immediately.
- Gather essential details. Collect: deceased's full name, age, date and place of death, cause of death, religion, civil status, and the next-of-kin's full name, relationship, contact number, and government ID.
- Explain service options. Walk the family through available packages, chapel assignments, casket selections, and add-on services. Be clear about what is and isn't included in each package. Present pricing transparently.
- Obtain consent and sign contract. Have the authorized next-of-kin sign the service contract. Issue a contract number and enter the case in the COTC system immediately. Provide the family with a copy of the signed contract.
- Payment terms. Explain the payment schedule. Record any initial payment collected, issue an Official Receipt, and enter the payment in the system. Apply SC/PWD discount if applicable — verify ID before applying.
- Document filing. File the signed contract, ID photocopy of the NOK, and any payment receipts in the case folder. Log all information in the COTC system under the correct contract number.
- Internal coordination. Notify the preparation room team, chapel coordinator, and dispatch team of the new case details. Confirm the estimated body arrival time if not yet received. Start the chapel assignment process.
- Signed service contract (NOK signature required)
- Government-issued ID of the NOK (photocopy on file)
- Official Receipt for any payments collected
Funeral Service Preparation
To coordinate and execute each funeral service flawlessly — from initial arrangements through post-service duties — ensuring a respectful experience for the family.
Funeral directors, chapel staff, and the coordination team handling each service.
- SOP: Chapel Assignment & Room Setup
- SOP: Body Transportation
- SOP: Burial / Cremation Permit Processing
- Review all arrangements. 48 hours before the service: confirm date, time, chapel, casket, flowers, clergy or officiant, hearse schedule, and any special family requests. Flag any unconfirmed item and resolve immediately.
- Coordinate with vendors. Confirm flower delivery time, transport vehicle availability, crematorium or cemetery reservation (if applicable), and any food or catering arrangements the family requested. Get written or text confirmations.
- Verify final body presentation. Before the family arrives: verify the body is dressed, cosmetics applied, and properly positioned in the casket. Confirm the ID tag matches. Do not let the family see the remains before this check is done.
- Chapel setup. Arrange the chapel per the family's preference: flower placement, framed photos, guestbook stand, candles, sound system, seating layout. Ensure the chapel is clean, cool, and ready 2 hours before the service.
- Pre-service inspection. 30 minutes before service start: verify sound system is working, lighting is correct, all signage is in place, and all assigned staff know their roles. Conduct a final walk-through.
- Service management. Assign staff roles clearly: door reception, flower management, family escort, and A/V operator. Brief all staff before the first family members arrive. The lead funeral director manages the flow of the service.
- Post-service duties. Assist the family with casket transfer to the hearse. Collect flowers per the family's instruction (keep, discard, or send to cemetery). Clean and reset the chapel. Update the case in COTC to reflect service completion.
Handling Personal Belongings of the Deceased
To ensure all personal belongings of the deceased are accounted for, securely stored, and returned only to the authorized next-of-kin with a proper paper trail.
First-call responders, transport staff, and intake officers at time of body receipt.
- SOP: Standard First Call & Cadaver Pickup
- SOP: Preparation Room — Cadaver Intake
- SOP: Medico-Legal & Unnatural Death
- Inventory at pickup or reception. At the scene or upon arrival at the chapel, list all visible personal items: jewelry, wallet, phone, watch, clothing. Be thorough — the family will ask about every item. Photograph the bag and its contents before sealing.
- Tag and seal. Place all items in a sealed, clearly labeled bag bearing the case log number, deceased's name, and date. Sign and date the seal. Never leave items loose or unlabeled.
- Secure storage. Store the sealed bag in the designated locked belongings cabinet. Record the cabinet slot number and case reference in the intake log. Only authorized staff may access this cabinet.
- Notify the family. During the intake meeting, inform the next-of-kin of all items in COTC's possession. Read the inventory list to them and have them confirm it in writing. Address any discrepancies immediately.
- Handover to authorized NOK only. Release items only to the authorized next-of-kin — the same person who signed the service contract. Require a government-issued ID and a signed belongings receipt before releasing. Never hand over to anyone else without written NOK authorization.
- Medico-legal exception. For medico-legal cases: do not remove, move, or inventory clothing and items until the investigating officer formally releases the body. Clothing and effects are potential evidence. The police must inventory these first.
Equipment Cleaning & Disinfection
To maintain a sanitized, infection-free mortuary environment and comply with DOH sanitation standards under PD 856 Chapter XXI and DENR-DOH Joint AO No. 02 s. 2005 (Health Care Waste Management), protecting staff and preventing cross-contamination.
All mortuary staff with access to the preparation room, storage areas, and transport vehicles.
- SOP: Embalming Procedures
- SOP: Staff Safety & Biohazard Handling
- SOP: Body Preparation & Preservation
- Daily surface disinfection. At the start and end of each shift, wipe all work surfaces with a DOH-approved disinfectant. This includes embalming tables, counter tops, sink areas, door handles, and any surface regularly touched by staff.
- Post-case preparation room clean-down. After each body preparation: scrub the table, floor, drains, and walls with disinfectant. Allow surfaces to air-dry or wipe thoroughly. Do not begin the next case until the room is clean and documented.
- Equipment sterilization. Autoclave all reusable surgical instruments after each use. Items that cannot be autoclaved must be soaked in an approved chemical sterilant per the product's required contact time. Single-use items are disposed of after each case — never reused.
- Refrigeration unit maintenance. Clean refrigeration bays weekly with a disinfectant safe for cold surfaces. Check and log temperature readings daily (target: 2°C–4°C). Report any unit malfunction immediately to management.
- Chemical storage check. Verify all embalming chemicals are sealed and stored per MSDS guidelines — away from food, heat sources, and personal items. Check expiry dates monthly. Dispose of expired chemicals through a registered chemical waste handler.
- Biohazard waste disposal. Segregate all waste per the DOH Health Care Waste Manual: yellow bag for soft infectious / pathological waste (Philippine standard — international biohazard symbol required), yellow puncture-proof container for sharps, black bag for general waste. Never mix categories. Arrange collection only through a DENR-registered hazardous-waste transporter and TSD facility as required by DENR-DOH Joint AO No. 02 s. 2005. Do not dispose of yellow-bag waste in regular trash.
- Log all cleaning activities. Sign and date the cleaning log after every complete clean-down. Include: date, time, staff name, areas cleaned, and products used. This log is subject to DOH inspection.
Staff Safety & Biohazard Handling
To protect all COTC staff from occupational health hazards associated with mortuary work, including bloodborne pathogen exposure, chemical hazards, and biohazardous material handling.
All COTC staff — especially preparation room, transport, and first-call personnel.
- SOP: Embalming Procedures
- SOP: Equipment Cleaning & Disinfection
- SOP: Body Transportation
- Mandatory PPE use. Gown, double gloves, face shield, and closed-toe boots are mandatory whenever handling remains or bodily fluids. Entry into the preparation room without PPE is prohibited, even briefly. PPE must be properly removed (doff) before leaving the prep area.
- Needle and sharp object safety. Never recap needles by hand — use the one-hand scoop technique or a needle recapper only. Deposit used sharps immediately into yellow sharps containers. Never overfill a sharps container past the fill line.
- Accidental exposure response. If skin or mucous membrane contact with bodily fluids occurs: immediately wash with soap and water for at least 15 minutes. Report to the supervisor. Seek medical evaluation within 2 hours. Complete an incident report form same day. Management must be notified immediately.
- Biohazard waste segregation. Per the DOH Health Care Waste Manual (Philippine standard): yellow bags with the international biohazard symbol for soft infectious / pathological waste (tissues, gloves, contaminated clothing); yellow puncture-proof sharps containers for needles, scalpels, trocars; black bags for general non-contaminated waste. Never mix — mixing is a compliance violation under DENR-DOH Joint AO No. 02 s. 2005. (Note: The Philippine DOH color code uses yellow for infectious waste, not red. Red is the US convention.)
- Body bag protocol for all external pickups. All external pickup transfers require the remains to be placed in a sealed, labeled body bag before transport. This is mandatory regardless of condition, cause of death, or family preference.
- Chemical hazard awareness. Reference the MSDS (Material Safety Data Sheet) binder for all embalming chemicals before first use. Ensure adequate ventilation in the preparation room at all times. Store chemicals in designated locked areas — away from food and personal items.
- Incident reporting. All accidents, exposure incidents, near-misses, or safety violations must be logged in the Incident Report Form and reported to management the same day they occur. Unreported incidents that later result in illness or injury expose the company to liability.
Foreign National Death — Pickup & Diplomatic Notification
To establish the legally compliant intake, custody, and diplomatic-notification protocol when a foreign national dies within COTC's service area in Bacolod City. This SOP protects the funeral home from cross-border liability and ensures the deceased's embassy and next-of-kin receive immediate notice.
Front-desk intake officers, dispatch coordinators, transport / extraction crews, the duty embalmer, and the operations manager. Triggered the moment a call identifies the deceased as a non-Philippine citizen.
- Identify the case as a foreign-national death at first call. The intake officer asks for full name and nationality. The moment the caller indicates the deceased is not a Filipino citizen, flag the case as
foreign_national = trueand route to the on-duty supervisor before dispatch. - Determine the place of death and gate the dispatch.
- In-hospital, attended: dispatch normally with cadaver release form. No PNP gate.
- Out-of-hospital (hotel, condo, residence, public space): DO NOT move the body until the Bacolod City Police District (BCPD) processes the scene and issues a physical field clearance / blotter entry. PNP MC 2014-006 mandates this for any unattended death — and foreign-national status elevates the scrutiny.
- Custody control at the scene — open Form FN-01. The field supervisor takes possession of:
- Foreign passport (verify nationality, photo, expiry)
- ACR I-Card if the deceased was a long-stay foreigner (Bureau of Immigration requires this for any foreigner staying beyond 59 days). Tourists hold a visa stamp only — no ACR.
- All physical cash, electronics, jewelry, watches
- Notify the embassy "without delay" — open Form FN-02. Within the same business day of intake, the operations manager (or designate) sends Form FN-02: Consular Notification of Death to the deceased's embassy in Manila. Pick the pre-built version that matches nationality. Email + phone the consular mortuary affairs / Citizen Services section. Log the timestamp of transmission and any acknowledgement received.
VCCR Art. 37 says "without delay" — there is no statutory hour-clock. COTC's internal target: same business day, ≤ 8 working hours from intake. Document the actual time on the case file regardless.
- Preservation hold pending consular & family instructions. Until the embassy or verified international next-of-kin sends explicit written instructions on disposition (burial in PH / cremation / repatriation), staff may only perform non-invasive measures: external sanitation, refrigeration at 2°C–4°C, surface cooling. No arterial injection, no cavity aspiration, no cosmetic work without authorization.
If consular contact is unreachable after 48 hours of documented attempts (calls + emails logged), escalate to the Operations Manager. PD 856 Chapter XXI still imposes the standard preservation/disposal timetable — do not let the body decompose because the embassy is slow. ⚠️ REVIEW: the 48-hour internal threshold is COTC operational policy, not statute. - Death certificate via LCR + endorsement to PSA. Route the medical Certificate of Death (signed by the attending physician or PNP/NBI Medico-Legal for unnatural cases) to the Bacolod City Health Officer for review. Register at the Bacolod LCR within 30 days (RA 3753). Immediately request the LCR to electronically endorse to PSA — embassies and repatriation airlines almost always require the PSA security-paper copy, not just the LCR copy. Order at least 3 PSA copies.
- Set disposition path. When instructions arrive from family/embassy:
- Burial / cremation in the Philippines → standard Burial/Cremation Permit SOP applies. Embassy may still want to attend or witness; coordinate.
- Repatriation overseas → switch to SOP-OPS-042: International Repatriation of Remains. Embalming, hermetic sealing, BOQ clearance, embassy consular mortuary docs, airline cargo booking.
If the deceased has no passport, no ACR I-Card, no verifiable next-of-kin, and no responsive embassy claim, treat the case as unidentified remains. Halt all standard processing. Transfer the case to the NBI Medico-Legal Division or PNP Crime Laboratory for forensic identification (DNA, dental, fingerprint). No specific statutory timer applies — COTC operational target is to make the referral within 48 hours of intake to avoid the body holding up regular operations. ⚠️ REVIEW: internal policy, not statute.
- Original Foreign Passport (photographed, secured)
- ACR I-Card or Visa Entry Stamps (photographed)
- Police Blotter / Scene Clearance (if non-hospital death)
- Embassy notification timestamp + receiving consular officer name
- Verified next-of-kin contact (relationship, ID, phone, email)
- Form FN-01 completed and counter-signed at scene
- Form FN-02 sent — Cc: Operations Manager + case file
- Property bag sealed, photographed, vault slot logged
- Disposition path decision pending / received / actioned
International Repatriation of Remains
To define the legal, sanitation, and logistics steps required to safely export human remains from Bacolod City to an international destination — most commonly the United States, Korea, Japan, China, Australia, or the UK. Triggered when family or embassy elects repatriation as the disposition path.
Licensed embalmers, operations manager, administrative documentation staff, transport / cargo coordinators. Triggered downstream of SOP-OPS-045 once disposition is confirmed as "ship overseas."
Plan 10–15 business days from intake to wheels-up: 3–5 days Bacolod (embalming + LCR + PSA + CHO), 5–7 days Manila (BOQ + embassy + cargo booking + crating). Set family expectations honestly — Manila bottlenecks routinely push the original 7-day estimate longer.
- Lock the consignee. Receive in writing — from the embassy or sworn next-of-kin — the licensed receiving funeral home overseas: legal corporate name, full physical address, phone, named contact, FDA/state license number. This consignee data is reproduced verbatim on every downstream document: BOQ clearance, embassy mortuary certificate, airline AWB, customs declaration. Errors here cascade into shipment delays at every checkpoint.
- Advanced embalming for international air transit. A DOH-licensed embalmer performs full arterial + cavity preservation to IATA / international shipping standard — stable for prolonged multi-leg transit. The embalmer issues a notarized Embalmer's Certificate (Form FN-03) attesting sanitary preparation. Keep this separate from the Mortuary Certificate — most receiving countries (US, KR, JP, AU, UK) require both as distinct documents. Combining them causes rejection at origin or destination.
- Local sanitary clearance + transfer permit. Present the registered Death Certificate to the Bacolod City Health Office for:
- Certification of Non-Contagious Disease — confirms cause of death is not a public-health risk. (Exact form name varies; Bacolod CHO sometimes wraps this attestation into the death certificate endorsement.)
- Transfer Permit / Permit to Transfer Cadaver — issued by the City Health Officer under PD 856 Chapter XXI IRR — legally authorizes movement of remains out of Bacolod LGU jurisdiction.
- Hermetic seal + outer crate + Mortuary Certificate (Form FN-04). Casket must be hermetically sealed: zinc-lined or heavy-gauge metal interior with continuous rubber gasket. Sealed casket then enclosed in a fumigated wooden shipping container (outer crate) with the deceased's full name and the overseas consignee's name + address stenciled on at least two external faces. The Funeral Director then notarizes Form FN-04: Mortuary Certificate attesting that the container holds only the remains of the named decedent + standard clothing/personal effects, no contraband.
- Bureau of Quarantine — domestic clearance (Bacolod-Silay BOQ desk). Present the document packet (LCR Death Cert + PSA copy if already issued + Embalmer's Cert + Mortuary Cert + Transfer Permit + Certification of Non-Contagious Disease) at the BOQ Bacolod-Silay Airport desk for the "Clearance for Domestic Shipment of Human Remains" (BOQ's official service title under RA 9271 Rule XI). Fee per BOQ Citizen's Charter — verify on arrival; don't quote a stale number to the family.
- Domestic cargo check-in + AWB. Process the crated casket through PAL Cargo or Cebu Pacific Cargo for BCD → NAIA Manila. Secure the domestic Airway Bill. Transmit the flight number, AWB, and ETA to the Manila handling agent — they need it to begin queuing the BOQ international clearance the moment the crate lands.
- BOQ International Clearance (main office, Port Area, Manila). Upon NAIA cargo arrival, present the full document packet to the main BOQ office or the NAIA international cargo BOQ deck for the "Clearance for International Shipment of Human Remains." Fee per current Citizen's Charter — verify on arrival.
- Embassy consular mortuary documentation. Contact the destination-country embassy in Manila to obtain the consular mortuary paperwork:
- US citizens → US Embassy Manila (
ACSInfoManila@state.gov) issues a Consular Mortuary Certificate, free of charge. COTC signs and notarizes the Affidavit of Foreign Funeral Director ourselves (the embassy accepts our affidavit as part of the packet — it is not issued by the embassy). Verify case-by-case whether the embassy needs to see remains. - Non-US citizens shipping TO the US → CDC 42 CFR § 71.55 (Aug 2020 rule) governs entry. No special CDC permit is required for properly embalmed remains in a leakproof container unless death was from a quarantinable communicable disease. Confirm cause of death is not on the current Executive Order quarantinable list before shipping.
- Other destinations (KR, JP, CN, AU, UK) → contact the respective embassy's consular/mortuary section to confirm document set. Most accept Embalmer's Cert + Mortuary Cert + Non-Contagious Disease Cert + PSA Death Cert. Verify each case — embassy requirements drift.
- US citizens → US Embassy Manila (
- International cargo booking — TSA Known Shipper compliance. Book Manila (MNL) → destination via a certified mortuary cargo broker in Manila. For shipments to the US, TSA's Known Shipper rule applies to the origin (Philippine) shipper — COTC or the broker must be registered as a Known Shipper with the chosen carrier (PAL Cargo, United Cargo, etc.). Common misconception: the receiving US funeral home does not need a Known Shipper Number for inbound international cargo — that requirement is on us at origin. Don't propagate the wrong claim to the receiving partner; it confuses them.
- Hand-off to receiving funeral home. Confirm with the consignee that they are ready to:
- Clear US Customs (CBP) — present original document package; CBP will not release remains to family directly.
- If destination is California: obtain the VS-9 Permit for Disposition of Human Remains from the destination county registrar (e.g., San Bernardino County Vital Statistics for Twentynine Palms — (909) 381-8990). The receiving CA funeral home obtains the VS-9 — not COTC.
- Coordinate ground transport from airport to family destination.
- PSA-issued Death Certificate on security paper (≥ 3 copies)
- LCR-registered Death Certificate (certified true copy)
- Embalmer's Certificate — notarized (Form FN-03)
- Mortuary Certificate — notarized (Form FN-04)
- Certification of Non-Contagious Disease — Bacolod CHO
- Transfer Permit / Permit to Transfer Cadaver — Bacolod CHO
- BOQ Clearance for Domestic Shipment of Human Remains
- BOQ Clearance for International Shipment of Human Remains
- Embassy Consular Mortuary Certificate (if US citizen, etc.)
- Affidavit of Foreign Funeral Director — notarized by COTC (for US shipments)
- Domestic Airway Bill (BCD → MNL)
- International Airway Bill (MNL → destination)
- Consignee acknowledgement / pre-clearance confirmation
- Do not combine the Embalmer's Certificate and Mortuary Certificate into one document — they must be distinct.
- Do not tell the receiving funeral home they need a TSA Known Shipper Number — that's on us at origin, not on them at destination.
- Do not route export documents through the Philippine DFA for US entry — the US Embassy in Manila has final say.
- Do not hard-code BOQ fees or embassy contact numbers in family quotes — verify at point of submission. Quote ranges, not point figures.
- Do not rely on the LCR Death Certificate alone — PSA security-paper copy is what embassies actually accept.
Death Certificate Filing (Local Civil Registrar)
To file the Death Certificate with the Local Civil Registrar within the legal 30-day window (RA 3753 — Civil Registry Law), enabling issuance of the burial permit.
Funeral directors and documentation staff handling LCR submissions.
- SOP: Burial / Cremation Permit Processing
- SOP: Medico-Legal & Unnatural Death
- Obtain a certified Death Certificate. Natural death: attending physician signs the Cause of Death section. Unnatural/violent death: PNP or NBI Medico-Legal Officer certifies. All required fields must be complete — the LCR will reject an incomplete form.
- Verify all fields before submission. Check: full name, date and place of birth, date and place of death, cause of death, informant name and signature (next-of-kin), civil status, citizenship, residence address. Missing fields = rejection.
- Submit to the Local Civil Registrar. File at Bacolod City Hall (LCR) within 30 days of death (RA 3753). Bring the original DC plus two photocopies. Pay the registration fee.
- Secure a certified true copy for the case file. Request a CTC from the LCR immediately after registration. This LCR-issued copy is available on the spot and is needed for the burial permit.
- Inform family about PSA timeline. The LCR forwards the registered DC to PSA. The family can obtain a PSA-certified copy approximately 6 months after LCR registration. Inform them early so they do not come back expecting COTC to provide it.
- Completed PSA Death Certificate form (signed by certifying physician or medico-legal officer)
- Valid government-issued ID of the informant (next-of-kin)
Burial / Cremation Permit Processing
To obtain the Burial or Cremation Permit from the LCR before interment, ensuring legal compliance and preventing delays at the cemetery.
Funeral directors and documentation staff.
- SOP: Death Certificate Filing
- SOP: Medico-Legal & Unnatural Death
- Confirm Death Certificate is registered. The burial permit is issued only after the Death Certificate has been accepted and stamped by the Local Civil Registrar. Do not apply for the permit until you have the LCR-stamped DC.
- Apply at the LCR or Local Health Office. Present the registered Death Certificate and the cemetery or crematorium reservation/authorization. Pay the permit fee. Processing is normally same-day or within 1 business day.
- Collect the Burial Permit. Receive the original Burial Permit. Do not leave without it — the cemetery will refuse the cadaver without this document.
- Schedule the interment. Only confirm the interment date and time after the Burial Permit is secured. Enter the date in COTC to trigger notifications to the team.
- Surrender permit to cemetery on interment day. The original Burial Permit must be handed to the cemetery or crematorium upon arrival. Keep a photocopy in the case file.
- LCR-registered Death Certificate (certified true copy)
- Cemetery reservation or crematorium authorization letter
Payment Collection & SOA Issuance
To collect payment accurately, issue BIR-compliant official receipts, and record all transactions in COTC for financial accountability.
Cashiers, funeral directors, and finance staff.
- SOP: Client Intake & Documentation
- SOP: Senior Citizen / PWD Discount
- SOP: Building & Saving the SOA
- Build the SOA in the system. Open the case in COTC and go to the SOA Builder tab. Add all services, casket, chapel days, and applicable discounts. Do not collect payment before the SOA is built and reviewed with the family.
- Present SOA to family. Walk the family through the SOA: total, inclusions, chapel charges, balance due. Answer all questions before proceeding. Print a copy if requested.
- Collect payment and issue OR. Accept payment (cash, check, bank transfer). Issue the BIR-registered Official Receipt immediately. Never accept payment without issuing a receipt.
- Record payment in COTC. Go to Revenue & AR in the Financials tab. Enter the payment amount, type (PARTIAL or FULL), and date. The SOA balance updates automatically.
- Track balance — let the system decide PAID/PARTIAL. COTC derives the PAID/PARTIAL status from the actual SOA balance — not from a manual flag. When the balance reaches zero, the case shows PAID automatically. Do not override this manually.
- Record disbursements. If cash collected is used for operational expenses (fuel, cotton, food), record each item in the Disbursement Breakdown panel of the revenue row. This creates a tracked expense entry automatically.
- Remit leftover to management. After all disbursements are recorded, use the Remit Leftover button to forward the remaining cash. This creates a Remittance record automatically — no double entry needed.
Senior Citizen / PWD Discount Procedure
To apply the 20% SC/PWD discount correctly under RA 9994 (Senior Citizens) and RA 10754 (PWD) and maintain BIR-compliant documentation to protect the company during tax audits.
Cashiers and funeral directors handling discounted service billing.
- SOP: Payment Collection & SOA Issuance
- SOP: Client Intake & Documentation
- Verify eligibility. Ask the family to present: OSCA-issued Senior Citizen ID or PWD ID card, plus one government-issued ID. Both must be shown and verified in person. Photocopies alone are not acceptable for initial verification.
- Compute the discount. The discount is 20% on qualifying COTC service fees. It does not automatically apply to third-party add-ons (e.g., flowers, transport from other providers) unless they are part of the COTC bundled package.
- Apply in SOA Builder. In the COTC SOA Builder, select the SC/PWD revenue type for the applicable line item. The system records it under the correct BIR classification automatically.
- Photocopy and file the ID. Photocopy the SC/PWD ID and attach it to the case file immediately. This is required for BIR audit purposes. Without it, the discount claim may be disallowed.
- Issue OR with correct discount notation. The Official Receipt must reflect the SC/PWD discount as a deduction, not simply as a lower total. This is the format BIR requires.
Creating a New Case in COTC
To open a unique case ledger in the COTC system the moment we accept responsibility for a deceased — so every downstream record (intake, SOA, payments, chapel, FSC) lives under one contract number.
Intake officers, funeral directors, and first-call dispatchers.
- SOP: Standard First Call & Cadaver Pickup
- SOP: Building & Saving the SOA
- SOP: Client Intake & Documentation
- SOP: Medico-Legal & Unnatural Death
- Start from First Call (preferred path). When a family or hospital calls for pickup: open First Call in the sidebar → Add Entry. Fill deceased name, contact person, location, and cause of death (if known). Save. This creates an
intake_logentry and triggers the 🚨 New First Call Telegram alert. - Convert to a full case. Once the body is in transit or received, open the intake entry and click Convert to Case. Confirm the auto-generated contract number — this number stays with the case forever and prints on every receipt, SOA, and FSC.
- Alternative: create case directly. If the body is already on premises and no first-call entry exists: go to Cases → Add Case. Use this only for walk-in / hospital-transfer cases where no field dispatch happened.
- Fill required fields immediately. Deceased full name, date of death, place of death, next-of-kin name + phone + relationship, service type (regular / BB FREE / pre-need), and cause of death. Missing any of these will block FSC generation and Burial Permit processing later.
- Flag medico-legal early. If the case is suicide, accident, homicide, or any unnatural death — tick the medico-legal flag on the case form. This locks chapel scheduling and embalming until Form ML-02 is signed. See the Medico-Legal & Unnatural Death SOP for the full hold sequence.
- Verify Telegram fired. Within 30 seconds the team Telegram group should receive a 🕊️ New Case notification. If it didn't, check whether
old_recordwebhook config drifted (see Telegram SOP).
Building & Saving the SOA (Statement of Account)
To produce the family's billing document — listing casket, chapel days, services, and discounts — and to lock the agreed contract amount into the case record.
Funeral directors, cashiers, and intake officers building the family's contract.
- SOP: Payment Collection & SOA Issuance
- SOP: Senior Citizen / PWD Discount
- SOP: Chapel Assignment & Room Setup
- SOP: Creating a New Case
- Open the case → SOA tab. From Cases, click the case row, then the SOA tab. If the SOA was already saved, you'll see it locked — click Edit to make changes.
- Pick the package or casket. Select the casket model (Bulto, half-glass, ordinary wood, etc.) or a bundled package. If "BB FREE" or "babywood" — system auto-marks the case as PAID (free service).
- Add chapel + days. Pick chapel key (C1–C5 main / ANXA–ANXE annex / HOUSE). Set start date and number of days. The chapel rate auto-applies: ₱2,000/day if bundled with a casket package; ₱3,500/day for chapel-only or "Individual Days" mode.
- Apply SC/PWD discount if eligible. Tick the SC/PWD line and enter discount amount. Verify ID before applying — see the SC/PWD SOP. The system records this under the SC_PWD revenue type for BIR compliance.
- Review the computed totals. Check Gross Contract Amount, Net Contract Amount, Payments Received (if any payments already recorded), and Outstanding Balance Due. Walk the family through this before saving.
- Click "Generate & Save" — once. One click writes
soa_data,contract_amount,chapel_no,payment_status, andsoa_finalized_atin a single atomic DB update. Do not click multiple times — do not navigate away mid-save. - Verify Chapel Board sync. Open the Chapel Board. The chapel you assigned should now show this case under the correct chapel slot within 1–2 seconds (Realtime). If not, click Refresh — it re-fetches from the DB, not from local cache.
Why PAID/PARTIAL is automatic: The system reads the actual SOA balance via
resolvePayStatus() — not the raw payment_status DB field. When balance reaches zero, the case shows PAID even if all payments were PARTIAL installments. Never manually flip the status.Recording a Payment, Disbursement & Remittance
To record incoming cash, log where any of that cash got spent on the same day, and forward the leftover to management — all in one accountable flow with no double entry.
Cashiers and operations coordinators handling family payments.
- SOP: Building & Saving the SOA
- SOP: Payment Collection & SOA Issuance
- SOP: Senior Citizen / PWD Discount
- Accept payment + issue OR immediately. Never accept money without issuing a BIR-registered Official Receipt the same moment. Cash or check — issue OR right away.
- Open Financials → Revenue & AR. Find the case row. Click to expand. Enter the payment amount, type (PARTIAL or FULL), and date. The SOA balance updates automatically. Stamp shows "Signed on as: [your name]" for accountability.
- Let the system decide PAID/PARTIAL. Do not manually flip the status.
resolvePayStatus()derives it from actual balance. Multiple PARTIAL payments that zero out the balance show as PAID automatically — that's correct behavior. - Open Disbursement Breakdown (same revenue row). In the expanded panel: Collected / Disbursed / Remaining figures appear. Click Add Disbursement to log each cash outlay: what (cotton, fuel, food, transport), where, date, amount. Each row inserts into
expensesas a DRAFT entry. - Fill BIR fields on disbursements when you have receipts. A draft disbursement shows in the Disbursements tab with the DRAFT pill until all four BIR fields are filled: Supplier Address, TIN, OR#, Account Title. Once complete, the row auto-flips to non-draft. The Disbursements tab badge counts pending drafts so you don't miss them.
- Remit leftover to management. When the remaining figure is settled, use Remit Leftover: pick recipient (cash custodian or bank), enter type. This creates a
cash_remittancesrow withsource_revenue_idlinking it back to this payment. The Final Settlement tab shows it automatically — no second data entry. Money owed to Cherry Blossom and Sinag for the case, and the VAT inside the payment, is set aside in the office first; only the balance is handed over. Print the Payment Record slip from the Final Settlement card. - Cross-check at end of day. Revenue & AR total – Disbursed total – Remitted total = 0 for every row that's been closed out. Anything not zero is either an unfinished draft or unremitted leftover.
Using the Chapel Board (Live Occupancy)
To give every staff member a single live view of which chapel is occupied by whom — eliminating double-bookings and "is C3 free?" radio calls.
All staff. Most relevant to funeral directors and chapel coordinators.
- SOP: Chapel Assignment & Room Setup
- SOP: Building & Saving the SOA
- Read the board. Sidebar → Chapels. Each chapel tile shows: deceased name, contract number, start/end dates, and remaining days. Empty tiles are available.
- How occupancy gets there. Saving the SOA with a chapel field writes
chapel_noon the case (C1–C5 / ANXA–ANXE map to "Chapel 1"…"Chapel E"; HOUSE is skipped from the board). The board listens on Realtime — saves appear within 1–2 seconds. - Refresh = true DB re-fetch. The Refresh button doesn't just re-render the screen — it calls
loadCases()to pull fresh data from the DB. Use it if you suspect another device's change didn't propagate (rare but possible if Realtime drops). - Sync from Contracts (catch-up for old cases). Cases whose SOA was saved before the chapel-sync fix may have empty
chapel_no. Click Sync from Contracts — it walks every active case and pushessoa_data.chapelKey→chapel_nofor any mismatches. Safe to run repeatedly. - Clear assignment after interment. Once the family has departed and the chapel is cleaned, archive the case or clear the chapel field. The board updates automatically and the slot shows available.
chapelKey probably differs from chapel_no — run Sync from Contracts. Don't manually edit chapel_no in the database; always go through the SOA.Generating a Funeral Service Contract (FSC)
To produce the printed FSC document that the family signs — pulling all required fields directly from the case so there's nothing to re-type.
Funeral directors and intake officers.
- SOP: Client Intake & Documentation
- SOP: Payment Collection & SOA Issuance
- SOP: Building & Saving the SOA
- Documents → FSC & Forms. Open the Documents tab from the sidebar. The FSC Generator panel is on the FSC & Forms tab.
- Search and select the case. Type deceased name or contract number in the search box, then pick the case from the dropdown. The read-only preview panel will populate with deceased name, contractee, date, casket, contract price, balance due, cemetery / burial date, and contact number.
- Fill payment amount + note (optional). If the family is making a payment with this FSC, enter the amount. Leave blank to print as a blank line for handwritten entry. Use the note field for things like "9,000 Senior" or "CMO AICS".
- Pick contract type + tracking number. Contract type: COTC (standard) or CMO AICS (DSWD/CMO assistance cases). Tracking number: leave blank to auto-assign sequential, or override manually if you're aligning with a paper logbook.
- Preview vs. Generate & Save. Generate FSC opens the document for print only — useful for double-checking. Generate & Save opens for print AND writes an FSC record (visible in the FSC Records table below). Always use Generate & Save for actual issuance; use Generate only for preview.
HR Portal — Overview & Access
To centralize all HR functions — 201 records, payroll, leave, vale advances, discipline, and government remittances — under PIN-controlled access for the three HR admins.
HR admins only: Gigi, Messiah, Lovewyn.
- SOP: Filing Weekly Payroll
- SOP: Staff Safety & Biohazard Handling
- Access. Open
hr.htmlfrom the deployed URL or from the COTC sidebar HR link. The portal uses its own PIN auth — not the Supabase login. Each admin has a personal PIN. Lock the portal when stepping away (Lock button top-right). - Tabs. Inbox (read-receipts), 201 Vault (5-doc compliance per employee), Contracts & NDA, Vale (advances), Live Payroll, Leave (approval only — submission is in OPS), Discipline log, Gov Remittances (SSS/PhilHealth/Pag-IBIG), 13th Month accrual, and Reports.
- Leave & Vale are approval-only. Employees submit Leave and Vale requests from OPS (ops.html) → Requests tab. HR sees them here for approval. Don't enter requests directly in HR — that bypasses the policy guards (cert for sick > 3 days, SIL tenure check, Solo Parent ID check) which only run on the OPS submission form.
- Payroll → Financials auto-sync. Saving a payroll record as PAID auto-creates a SALARIES_WAGES expense in the index.html Financials tab via a Postgres trigger. Don't double-enter in expenses. See the Filing Weekly Payroll SOP for the full process.
- Gov Remittances & 13th Month auto-sync too. "Remit" button on each Gov Remittance month creates an EMPLOYEE_WELFARE expense via trigger. "Release 13th Month" on the ledger modal creates a SALARIES_WAGES expense. Both bypass RLS via SECURITY DEFINER — that's intentional, since HR uses PIN auth (anon role) which cannot INSERT into expenses directly.
- 201 Vault enforces the 5-doc minimum. Every employee record must have: Resume, NBI Clearance, Police Clearance, Barangay Clearance, and a recent ID photo. The Vault tab flags missing documents in red. Update before any audit or DOLE inspection.
Filing Weekly Payroll (HR Portal)
To compute and release each employee's weekly pay correctly — applying the Monday→Sunday cycle, individual daily rates, holiday/rest-day pay, and any active vale deductions.
HR admins only.
- SOP: HR Portal — Overview & Access
- Pay period rule. Every pay period runs Monday (start) → Sunday (end). Payday = end + 1 = following Monday. The Advances ledger displays the payday Monday, not the start Monday — that's intentional, to match the HR sample ledger.
- Open HR → Payroll → Add Record. Pick the employee. Pay period start auto-snaps to the most recent Monday. End auto-fills to +6 days (Sunday). Payroll month groups by the
payroll_monthfield — important for end-of-year boundary cases. - Enter days worked + daily rate. Daily rate pulls from the employee's profile (₱525 default; Jafe ₱700; Benjie ₱400). Days worked × rate = base. All inputs are auto-clamped to ≥ 0 — typed negatives won't compute.
- Add holiday/rest-day pay if applicable. Holiday Extra (HE): regular holiday pay. Rest Day Pay (RD): work performed on the employee's rest day. The DB stores
holiday_extra_pay = HE + RDas a single field; the edit dialog re-splits them so RD doesn't double-count on re-save. - Apply vale deductions. If the employee has an active vale (cash advance), the installment auto-pulls from the advances ledger for that pay period. Net pay updates live. If net pay goes negative, the system blocks the save with a toast — adjust deduction amount or split across multiple periods.
- Mark PAID → Financials sync fires. Saving the record as PAID triggers
tr_sync_payroll_to_expense(Postgres SECURITY DEFINER) — a matching SALARIES_WAGES expense appears in index.html Financials within seconds, linked bypayroll_record_id. Idempotent: re-saving the same record updates the linked expense, doesn't duplicate. - Release cash + sign the ledger. Print the payslip. Hand cash (or initiate bank transfer). Get the employee's signature on the physical ledger. Photograph signed ledger and attach to the case file if it's a contested period.
toISOString() for date-only operations — it outputs UTC and shifts dates by one day in Philippine time. Use todayPH() or getFullYear()/getMonth()/getDate() (local time). The HR portal already follows this — don't introduce regressions.Telegram Notifications — What Fires & When It Doesn't
To explain which DB events fire which Telegram alerts so staff know what to expect — and what to check when an expected notification doesn't arrive.
All staff (for awareness); admins (for troubleshooting).
| DB Event | Message | Where |
|---|---|---|
intake_log INSERT | 🚨 New First Call | Group |
cases INSERT | 🕊️ New Case | Group |
cases UPDATE (delivery_date) | 🚚 Delivery Scheduled | Group |
cases UPDATE (interment_datetime) | ⚱️ Interment Scheduled | Group |
staff_tasks INSERT | 📌/🚨 Task assigned | Group + personal DM |
chapel_requests INSERT | 🔔 Chapel Help Request | Group |
- Wait 30 seconds first. Telegram delivery can lag 10–30 seconds at peak. Don't troubleshoot before the minute is up.
- Confirm the DB row was actually written. If the page didn't show the new case/task on refresh, the INSERT itself probably failed — that's a DB issue, not a Telegram issue.
- Check the Edge Function logs (admin). Supabase Dashboard → Edge Functions →
notify-telegram→ Logs. The function throws on Telegram API errors, so failures show with the response body. Common causes: bot token rotated, group chat ID changed, network blip. - DM not received? Check display name + UUID. The function looks up the recipient by
user_profiles.user_id = assigned_to(UUID) first, then falls back to ilike match ondisplay_name. If both lookups fail, the DM silently drops. Open the assignee'suser_profilesrow and verifytelegram_chat_idis set. - Duplicate notifications? Check the cases-updates webhook. If
old_recordisn't included in the webhook payload, the function can't detect what changed. Supabase Dashboard → Database Webhooks →notify-case-updates— make sure "Include old record" is on. The function early-returns ifold_recordis missing (safety net) so missing config shows up as no notifications rather than duplicates.
staff_tasks INSERT sets telegram_sent = true after a successful send. If you re-trigger the row (e.g., a retried webhook), the function skips it. This prevents the "task spammed 8 times" problem.Inventory — From Asking For It To Using It
To give one single set of instructions for the whole life of a supply — from the moment a staff member says they need something, through approving it, buying it, putting it on the shelf, using it, and closing the request off if it never turns up. Everything is counted by scanning, not by typing a guessed number, so the system always knows exactly how many of an item exist and, for regular supplies, exactly which physical box is which.
All staff who ask for supplies, approve requests, receive deliveries, use supplies against a case, or manage casket purchase orders — including staff who have never used this computer system before. This document assumes no prior experience at all; every screen, button and term is spelled out below.
Read this once before anything else. Every procedure below is one leg of the same journey, and each leg hands over to the next:
Anywhere this procedure says “scan,” it means one of two things, and either is fine:
- Camera scan (the usual way): click the small button labeled Scan next to the box you’re filling in. It turns on the device’s camera (phone, tablet, or a computer with a webcam) and shows you a live picture — point it at the barcode or QR sticker until it beeps/flashes and fills the box in by itself.
- Type it by hand (if the camera isn’t available or won’t focus): every one of these boxes also accepts plain typing, or a handheld barcode-gun scanner if the front desk has one — a barcode gun just types the code for you automatically, faster than a camera.
- A1 · Open the requisition form. In the Ops app, go to the Inventory tab and choose New Requisition. Your own name fills in by itself under Requested By — you do not type it.
- A2 · Choose how urgent it is. There are four levels, and they mean different things — pick honestly, because if everything is marked urgent then nothing is.
- Normal Requisition Day — MONDAY — the ordinary weekly buying run. Use this for almost everything.
- Urgent (24h) — needed within a day.
- Immediate Service Need — needed right now for a family being served today.
- EMERGENCY — Out of Stock, Operations Essential — we have run out completely and cannot work without it. This one shows as a red badge on the approver’s screen and sends an alert. Do not use it for anything less.
- A3 · Write down what you need — in your own words. The first box, “What Do You Need?”, is blank on purpose: type exactly what you want, however you would normally say it. Add a Unit if it helps (pack, roll, bottle) and the Quantity Needed. There is also an optional “Or Pick From Stock” list underneath — if the thing you need is already a tracked item, picking it there shows you what it cost last time. Use whichever is easier; you do not need both.
- A4 · Add each thing in turn, then submit. Press Add and it drops into the list below. Repeat for everything you need on this trip — one list, many items. Add a note if there is anything the buyer should know, then Submit. The list is given its REQ number right then, and Ma’am Gigi and Sir Lovewyn are notified.
- A5 · Watch it under My Requisitions. The same Inventory tab has My Requisitions, showing every list you have raised, its REQ number, and each item on it — whether it has ARRIVED, is part-way in (“1 of 3 IN”), or has been marked NOT COMING.
- B1 · Open the lists. Go to Financials → Supplies → Requisition Lists. Each list shows its REQ number, who asked, how urgent it is, every item, and an estimated total.
- B2 · Approve or reject. A list waiting on a decision shows Approve and Reject buttons. Anyone else looking at it sees only “Awaiting approval from Gigi or Lovewyn” — they cannot decide it.
- B3 · Print the shopping checklist. Use Print to give whoever is going shopping a paper copy with the REQ number on it.
- B4 · There is no “mark it finished” button, and that is deliberate. An approved list closes itself once every item on it has been received through Stock In. Nobody has to remember to tick it off.
- C1 · Nothing to prepare — stickers are made after the stock is entered. The system creates a QR code for every single box at the moment you save the purchase, and offers the sheet to print straight away. You no longer need a stack of blank stickers waiting by the door.
- C2 · Open the Stock In screen. Click Inventory in the left menu, then the Stock In tab. You’ll land on New Stock In (there is a second sub-tab called Quick Bind — ignore that one; it’s only for special cases). Important: only use this screen for a purchase that hasn’t been entered anywhere else yet — if it was already recorded through Case Orders → Supplier Payments, entering it again here would count the money twice.
- C3 · Fill in the receipt first — just once, however many products are on it. Step 1 is “The Purchase”: the Supplier / Store Name, the Tax Treatment, the Payment Mode, and the Reference # — the invoice, PO, OR or SI number printed on the supplier’s own paperwork. If the supplier has never been used before, a red box opens asking for their address, contact number and TIN (or tick “no TIN” for a market vendor). Fill it in — that’s what keeps the tax number right on every future purchase and on your BIR books. Then finish the part for the books underneath: date, category, OR/receipt number (or tick “No receipt available” and say why), check or voucher number, supplier address, account title, and the linked case if the purchase belongs to one family. You can attach a photo of the receipt too.
- C4 · Say which requisition each item is for — if there was one. Step 2 starts with two questions: “Which Requisition Is This Item For?” and “Which Item On That List?” Pick the REQ number and the item, and that item gets ticked off its list automatically when you save. This is optional — if nobody asked for it on a list, leave it reading “Not from a requisition — bought without a list” and carry on. Only half-filling it is refused: if you name a list you must also say which item on it, otherwise nothing would get ticked off and nothing would tell you. Picking a list item that is already a tracked product selects it for you below; if it was written in by hand, you’ll be told to use + this is a brand-new item, which is what turns it into a properly tracked product from then on.
- C5 · Now add each product on that receipt, one at a time. For each product: scan its barcode (or pick it from the catalog list, or press + this is a brand-new item). If the barcode has never been seen before, there’s a “Look up this barcode online” button that can fetch the product’s real name for you — check it reads correctly before accepting it. Then type the Unit Cost (price per piece, before tax) and How Many Came In, and press Add This Item to the Receipt once. A green “Item added” message confirms it, and it drops into the list below as Item 1, Item 2, and so on, with a running total and its REQ number beside it. Choosing This Is a Brand-New Item hides the catalog list underneath, so after the new item’s details you go straight to Unit Cost. Not sure what is still missing? The orange box at the bottom of the screen always says what to fill in next, and the box it means is outlined in orange.
- C6 · Repeat for every product from that same trip. The supplier and all the paperwork above stay exactly as you typed them — only the item boxes clear. So one supermarket run covering soap, cotton, glass cleaner and bleach is one receipt with four lines, not four separate entries. Two items on the same receipt can belong to two different requisitions — that is fine, each one is asked separately. If you add the wrong thing, press the small × beside that line to take it out.
- C7 · Save the whole receipt, then print the stickers. Scroll to the bottom and click the green Commit Stock In button. It saves every item at once — if any one of them can’t be saved, none of them are, so you never end up with half a receipt recorded. It adds the stock, files a separate disbursement in Financials for each product, ticks off every requisition item you named, and creates a QR sticker for every single box. If that was the last thing a list was waiting for, it tells you that list is now complete. It then asks whether to print now or add them to the print pile: if there are only a few, add them to the pile and print later from Shelf QR Tags → Stickers Waiting to Print, which puts every waiting sticker from every receipt on the same sheets so no paper is wasted. After a sheet prints, answer Yes, they printed so they leave the pile. Cut them out and stick one on each box before it goes on the shelf. The first sheet also has a stamp to cut out and stick on the supplier’s paper invoice, so nobody enters that receipt a second time. Lost the sheet? Shelf QR Tags → Reprint Stickers From a Past Stock In, type the reference #, and the very same codes print again.
- C8 · Later — when a box is taken off the shelf to be used. Go to Inventory → Dashboard tab (the very first tab) — there’s a box there labeled “Scan Out.” Scan that specific box’s sticker there (staff working out in the field instead of at the desk can do the exact same thing from the Ops app, which has its own matching scan box). The system finds that exact box, subtracts one from stock, and marks that sticker Issued so it can’t be scanned out a second time by accident.
- D1 · Why this exists. A list only finishes when every item on it has arrived. If the supplier simply never had one of them, that list would sit open forever waiting for something that is never coming.
- D2 · Mark it. Find the item — in the Ops app under Inventory → My Requisitions, or in COTCHUB under Financials → Supplies → Requisition Lists — and press Not coming beside it.
- D3 · Say why. This is required. Choose one: Supplier had none, No longer needed, Bought somewhere else, or Other (which asks you to type what happened, and will not accept a blank). The reason and your name are kept against that item.
- D4 · What happens next. The list stops waiting for that item, and if it was the last thing outstanding the list finishes itself immediately. The quantity you originally asked for is not changed — the record still shows 4 were wanted and none came, which is exactly what tells you later whether a supplier is worth using again.
- D5 · If you press it by mistake, or it turns up after all. Press It is coming after all and the item goes straight back on the list. If the goods simply arrive later, receiving them through Stock In puts the item back by itself — but note a stopped item is not offered on the Stock In screen, so you must press that button first before you can receive it.
- E1 · Caskets are ordered from their own screen, not Stock In. Click Inventory in the left menu, then click the Caskets tab, then the Order & Receive sub-tab. This is the only place casket purchases ever get entered — never the Stock In or Quick Bind tabs, even though they’re on the same Inventory page. Caskets do not go through requisitions either.
- E2 · Creating the order prints the stickers immediately — before anything has even arrived. When you fill in and submit a new Purchase Order for, say, 5 caskets, the system immediately prints 5 unique, individually numbered stickers right then and there — one per casket ordered. These get attached to each casket the moment it physically shows up.
- E3 · It’s completely normal for caskets to arrive in batches — the system expects that. When some caskets physically show up (even if it’s not all of them at once), find that Purchase Order in the list and click Mark Delivered (the button says Receive More instead if part of the order already arrived earlier). A box will ask exactly how many arrived this trip — type that number, not the full original order size if only some showed up. The order stays open on the screen, showing it’s still owed the rest, until every casket originally ordered has eventually been received, no matter how many separate deliveries that takes.
- Marking an ordinary weekly item as EMERGENCY. That level means we have run out and cannot work — if it is used for everything, the red badge stops meaning anything.
- Naming a requisition on the Stock In screen but not saying which item on it — the system refuses this, and it is refused on purpose.
- Typing a quantity number for regular supplies instead of scanning each box one at a time.
- Using the Stock In tab for a casket delivery — caskets only ever go through Caskets → Order & Receive.
- Entering the same delivery twice — once here and once under Case Orders → Supplier Payments.
- Forgetting to physically stick the QR sticker onto the box right when you print the sheet — an unattached sticker is easy to mix up later.
- Entering the full original casket order quantity into “Mark Delivered” when only part of it has actually shown up.
- Marking an item Not coming just because it hasn’t arrived yet. That mark is for something that is genuinely never coming — not for something still on its way.
- A device with a camera (phone, tablet, or computer webcam) — or a handheld barcode-gun scanner if the desk has one
- The supplier’s invoice, purchase order, OR, or SI number, to type into the Reference # field
- The REQ number of the list the goods were bought for, if there was one
- Scissors and the printed sticker sheet, to cut and attach before anything goes on the shelf
- There is no blank-sticker printer any more — the system prints the real ones for you the moment you save, so there is nothing to prepare in advance.
HR — Leave, Vale, Employee Loans & Pay
One set of instructions for everything an employee asks HR for — leave, a vale (cash advance), a day-off change or swap, and an employee loan — and for how HR approves it, pays it out and takes it back from pay. The same rules apply to everyone.
Part 1 is for every employee. Part 2 is for the three HR admins: Ma’am Gigi Abecia, Sir Lovewyn De Ocampo and Messiah Cael B. Ave.
- Open the Ops app → Requests → Leave Form.
- Pick the type of leave, the first and last day, who will cover for you (Substitute — required), and the reason.
- File at least 3 days ahead, except for real emergencies and sickness.
- Sick leave longer than 3 days: upload a medical certificate. SIL needs at least 1 year of service. Solo Parent leave needs your Solo Parent ID.
- Press Submit. Check Leave History for Approved or Rejected.
1. Only for these four urgent reasons: medical emergency; death in the family; calamity (typhoon, fire, flood); urgent deadline (school, utility bill, eviction).
2. A photo of the proof is required (hospital bill, death notice, school or utility bill, etc.).
3. At most ₱2,000 per request.
4. You may never owe more than ₱2,000 in vales in total.
5. At least 75% of your current vale must be paid before you can ask for a new one. (A request still waiting for HR counts as unpaid.)
6. No new vale while you have an employee loan that is not yet fully paid.
- Open the Ops app → Requests → Vale Form. The form shows what you still owe and how much you may ask for.
- Type the amount and the weekly deduction you can afford.
- Pick the reason, explain in your own words (at least 10 letters — “Allowance” alone is not accepted), and add the photo of the proof.
- Pick when you need it, tick I authorize the deduction, and press Submit once. If the form says you cannot ask yet, the red message tells you exactly why.
- Check Vale History. Once approved, the weekly deduction comes out of your payslip automatically.
- Open the Ops app → Requests → Day-Off / Swap.
- Pick Change (move your own day off) or Swap (trade with a named co-worker), the dates and the reason, then Submit. Wait for approval before changing your schedule.
A loan is bigger than a vale, has no interest, and is not requested on the app — talk to HR. The rules:
- Who can borrow: regular employees with at least 1 year of service.
- How much (one month’s pay = daily rate × 26): 1 to under 3 years → half a month (₱6,825 at ₱525/day); 3 to under 5 years → 1 month (₱13,650); 5 years or more → 1½ months (₱20,475).
- How you pay it back: every week, twice a month (15th and 30th), once a month (30th), or your own dates and amounts — taken from your pay, or paid by you directly. A payment taken from your pay is no more than 20% of your basic pay for that period (₱630 a week, ₱1,365 twice a month, ₱2,730 a month at ₱525/day), and the loan is paid off within 52 weeks. In a short week the system takes less and the rest is added to the next payments.
- One loan at a time. Both Ma’am Gigi and Sir Lovewyn must approve it.
- You sign four papers: Application, Promissory Note, Salary Deduction Authorization and, on the day you get the money, the Release Receipt. HR explains them in Hiligaynon and gives you copies.
- Unpaid vale: on release day it is paid off from the loan, so you receive the loan minus the vale.
- Third Monday of December rule: whatever is still unpaid on the third Monday of December (December 21 in 2026) is taken from your 13th month pay. This applies however you pay, even if you pay on your own — you always sign it. Anything left continues on your regular schedule.
- If you leave the company, the unpaid balance is taken from your final pay. If that is not enough, you sign a payment schedule for the rest. A loan is never a reason to stop you from resigning.
Pay weeks run Monday to Sunday; you are paid the following Monday. Your payslip shows the vale deduction and the loan deduction on separate lines, and the loan balance left after that payslip.
- A Telegram message tells Ma’am Gigi when a new leave or vale arrives. Open HR → Inbox and tap the request.
- Vale: tap Open proof photo and check it matches the reason. A red box means the request breaks a vale rule (owes too much, not 75% paid). You may still approve it — it is a warning only — but you are making an exception.
- Press Approve once. The button ignores extra taps, and an already-approved request cannot be approved again. To refuse, press Reject and type the reason — the employee sees it.
- File it: New Loan Application. Pick the employee, date, amount asked for, amount to approve, how often (every week / 15th and 30th / 30th) and the amount per payment — or pick Other and add one line per payment (date and amount); the lines must add up to the loan. Tick The employee will pay on their own if it is not taken from the paycheck — then record each payment with Record a Payment; the card shows if they fall behind, and the payslip loan box stays locked at ₱0. The Salary Deduction Authorization (13th month and final pay) is still signed for every loan. The box below checks every rule; red lines mean it is outside the policy.
- Print the papers (they fill themselves in), explain them in Hiligaynon, have them signed, and tick each one on the loan card as it comes back.
- Approve: Ma’am Gigi fills the Branch Owner slot, Sir Lovewyn the VP slot. Both are needed. If the loan is outside the policy, the approver must type a reason, which is saved. Messiah can file, print and tick papers but cannot approve.
- Release (Ma’am Gigi or Sir Lovewyn only): needs the Application, Promissory Note, Deduction Authorization and “explained in Hiligaynon” ticked. The window shows the loan, the unpaid vale paid off, and the cash to hand over. Pick the date and Bank or Cash.
- Extra payment or leaving: on the loan card use Record a Payment or Employee Leaving — Final Pay.
- Mistakes are fixed with Decline or Cancel. A loan is never deleted.
- Pick the employee and the Monday–Sunday week, and enter days worked. The vale and loan lines fill themselves in. You can type over them; the loan line refuses more than the balance.
- Save as PAID. Pay goes into Financials by itself, and the loan and vale balances update. Saving as Draft records no payment.
- Print the payslip, pay the employee, and get the ledger signed.
Release on or before December 24. If the employee has a loan, the release window takes out the balance unpaid as of the third Monday of December and shows the cash to hand over. The full 13th month is still recorded as the company’s expense.
Press Remit on the month. The boxes are filled with the staff share plus the company share; replace them with the amounts on the actual SSS, PhilHealth and Pag-IBIG bills. Only the company share is added to Financials, so the staff share is not counted twice.
Delivery Items — Home Viewing
Every piece of our equipment that goes to a family's home for a wake — candle stands, the casket stand, chandeliers, the crucifix, a carpet, bulbs, the curtain — is written down when it leaves and scanned when it comes back, so nothing is left behind or lost.
Home viewing only. A chapel viewing needs none of this — the equipment is already inside the chapel, and the app does not ask. It applies to the driver and helper on the delivery, and to the office.
- Your phone with the Ops app, signed in with your PIN.
- The QR code sticker on each item (one code per kind of item: DLV-01 Candle Stand … DLV-18 for the carpets).
- The printed Delivery Items Checklist from the office.
- Open Ops → Deliveries and find the family. Press Acknowledge on your name.
- The Delivery Items page opens. For the indigent casket and the Junior Half Glass, the usual set is already ticked. Untick anything you are not taking and fix the numbers.
- On the Carpet line, pick which carpet you are taking. A carpet already at another family's home cannot be picked.
- Anything else you are taking goes in Additional items (write in): the name and how many. Press Add another line for more.
- Press Done once. If you closed the page by mistake, press Pick Delivery Items on the delivery.
- The office presses Print Delivery Items Checklist on the client’s card in the Cases list (in the middle of the card) (or Checklist on the case’s Delivery step). Sign the checklist and take it with you. On pick-up day, Return House Viewing Items prints the return sheet.
When the family calls for something else, or needs a makeup retouch:
- Open Ops → Deliveries. At the top, under Items to bring back, find the family and press Visit (or Second Visit — Add Items on the delivery).
- Write what the visit is for (required), e.g. “Makeup retouch”.
- Tick only what you are taking on this visit, or write it in. Press Done. It is added to the items already at the home.
- Open Ops → Deliveries. Under Items to bring back, press Scan Back for the family.
- Press Open Camera Scanner and scan the QR code on each item. (If the camera does not work, type the code, e.g. DLV-01, and press Enter.)
- Check the number that came back and press Check In. The button stays locked until that item is scanned.
- Written-in items have no QR code: enter how many came back and press Check In.
- When everything is in, press Finish Pick-up.
- If anything did not come back, the app asks before finishing. If you finish anyway, Ma’am Gigi and Sir Lovewyn get a Telegram message naming the family and the items.
- The family stays on Items to bring back until the missing items are scanned in. Go back for them and scan them the same way.
- Case → Delivery step → Delivery Items shows what was taken, what came back, every visit, and anything still missing.
- New item to lend out? Add it in Inventory with Pool / Loanable Asset ticked and print its QR code. To set how many we own, scan its code in Ops → Inventory and press Add Stock.
Bacolod City, Negros Occidental • Dynamic Due-Date Sorting, Cyclical Rollover & Penalty Detector
| Requirement & Agency | Filing Platform / Office | Current / Next Due Date | Urgency Status | Statutory Notes & Delinquency Penalties | Cycle Action |
|---|---|---|---|---|---|
| Loading... | |||||
| Date Paid | Requirement | Amount Paid | Marked By | Receipt | Notes | Status |
|---|---|---|---|---|---|---|
| Loading... | ||||||
Most Meaningful Moments
| Loading... |
This is the only way new caskets enter stock — every casket is created from a purchase order, never on its own. Step 1 logs the order and immediately prints one unique QR sticker per unit ordered — stick one on each casket as it arrives. Step 2, further down this page, is where you actually receive them: once the batch physically arrives, find its row under Purchase Orders and press Mark Delivered to post it into Stock.
When a batch physically arrives, find it below and press Mark Delivered — that's what actually posts it into Stock. A PO stays listed here as "ORDERED" until you do this.
A family may rent a casket for viewing and return it if they switch to cremation. Once returned — by scanning the same sticker — it moves into RR (Recycle-Reuse) reserve stock, kept separate from new stock, for indigent no-viewing direct-burial cases.
Only for purchases NOT already recorded via Case Orders → Supplier Payments — entering the same purchase in both places double-counts it in Financials.
Fill these in once and they’re remembered for every future purchase — and your BIR purchase journal gets the right details instead of a blank.
Scan the barcode on the box. A recognised barcode fills the item in by itself; an unrecognised one can be looked up online or created here. Add each product in turn — they all stay on the one receipt above.
This item is created, and this code bound to it, the moment you press "Commit Stock In" below — no separate save step.
Committing saves every item on the list at once — it adds the stock, creates a QR sticker for every single box, and files the full disbursement in your BIR ledger and Financials. If any one item can’t be saved, nothing is saved, so you never end up with half a receipt recorded.
For re-printing a lost sticker, or labeling an item ahead of its first delivery — not the everyday path. Real stock coming in on the "New Stock In" tab already binds an unrecognized barcode as part of that flow, no extra step needed. Bind a manufacturer UPC and/or an internal QR code to a catalog item (printed under Shelf QR Tags) or a casket type (printed under the Caskets tab's Casket Master QR sub-tab) — for supply items, this is also what ops.html's Scan Out matches against. Casket types aren't scanned out like supplies — they're assigned to a case through the existing casket workflow — so their code is for shelf/bin labeling only.
The coloured band across the top of every box sticker tells you which department it belongs to, so a shelf can be read at a glance. The department name is printed on the sticker too.
Box stickers from every Stock In that have not been printed yet. Print them all at once, 50 to a page, so you don’t waste a sheet on just a few. The small stamps for the supplier’s paper receipts print at the end.
Stickers are generated automatically when stock comes in, one per box. If a sheet was lost, misprinted or never printed, search for it here by the receipt #, the requisition # (like REQ-2026-0005), a sticker code (TAG-000123) or part of the item name, then print the very same codes again — they never change, and reprinting does not create new ones.
Stickers for the equipment we lend to families for a home wake. One sticker for every piece we own (every piece of the same kind has the same code), and one for the box of bulbs. Untick or change a number to print only what you need — printing again makes the very same codes.
These are for the things that stay here and just need counting — chairs, tables, fans, speakers. Fill these in and the preview below changes as you type.
You never type the number. The system hands out the next one in the fixed-things run — ASSET-000001, ASSET-000002, and so on — and remembers where you stopped, so no two labels can ever come out carrying the same number. It picks up from there next time, even if somebody else printed the last batch on another device. This run is completely separate from the box stickers that print after a Stock In (those are TAG- numbers), so the two can never get mixed up.
QR Code for a phone camera. Barcode for a handheld scanner gun — still the one already picked when this page opens, since the fixed things use stripes.
What to do with them: stick a label on the shelf or bin the chairs live on, then go to Inventory → Pair Barcodes, scan it, and pick “Chairs” from the list. From then on scanning that label brings up Add Stock / Check Out / Check In for the chairs. A printed label belongs to nothing until you pair it, so an unused sheet is never a problem.
Point a scanner at those stripes and it reads the number underneath them.
Check the numbers run the way you expect, then press Print Labels.
Every stock movement — receiving (IN) and scan-out/requisition fulfillment (OUT) — in one continuous, running-balance record, pursuant to BIR Computerized Accounting System (CAS) recordkeeping.
Nothing on the ledger can ever be deleted. If something was logged by mistake (e.g. entered twice), flag it from the BIR Stock Ledger with a reason. Only Gigi or Lovewyn can approve a correction — approving posts a visible reversing entry; the original stays on the record either way.
Company policy: a physical count is required twice a year — every six months.
Compare what's actually on the shelf to what the system thinks you have. Starting a count freezes the system quantities at that moment so later scans don't change what you're counting against. Finalizing posts a correcting entry for every real variance and permanently records who counted and who verified it.
Per RMC 57-2015 (as amended by RMC 8-2023): the full Annual Inventory List — Annex A schedule + notarized Sworn Declaration — must be submitted as a soft copy within 30 days after year-end (Jan 30). Fill in your BIR profile below before exporting or generating the declaration — these are legal documents and will never be generated with placeholder numbers.
Select a period above
Select a period above
Select a period above
Select a period above
Select a period above
Select a period above
Open that family's collection in Revenue & AR, log every expense first, then press Remit Leftover. That keeps the money tied to the case it came from.
Past 11:00 AM = charged as another full day.
| Chapel | AC Room | Non-AC Room |
|---|---|---|
| One (1) | ₱15,000 | ₱7,500 |
| Two (2) | ₱15,000 | ₱7,500 |
| Three (3) | ₱18,000 | ₱9,000 |
| Four (4) | ₱13,000 | ₱6,500 |
| Five (5) | ₱13,000 | ₱6,500 |
| Annex (A–E) | — | ₱4,000 |
| Annex (A–E) — Chapel Rental | — | ₱4,500 |
| # | ITEM / DESCRIPTION | QTY / DAYS | RATE / PER DAY | DISCOUNT / PLAN | BALANCE |
|---|---|---|---|---|---|
| Select casket or chapel to populate SOA | |||||
Present this document upon payment.
Click "Save & Track Vendors" after selecting a chapel.
Record a Gov't Assistance entry in the Payments section above.
| Verified | Document Type | Issuing Authority | Doc Ref No. |
|---|---|---|---|
| PNP Blotter / SOCO Report | |||
| Autopsy Report / Health Officer Waiver | |||
| Registered Medical Death Certificate | |||
| Fiscal No-Objection Certificate (If Cremation) |
This doesn't change anything yet — it sends a request to Gigi or Lovewyn to review. Nothing on the ledger is touched unless they approve it.
Scan the sticker on the physical casket being returned — it must match the unit that was rented out.
Record is unlocked. Will re-lock automatically after saving.
Add everything needed for this trip, then submit the whole list at once — like a grocery list. It can be printed once approved.
No items added yet — pick something above.
Item is a case-billable item — pick the family this is going out for.
This box is already selected for you — a handheld scanner just needs you to pull its trigger on the item's sticker, no typing needed. It fills in and looks the item up by itself.
The bill (SOA) and the Payments tab must say the same thing before a case can be marked Full Payment (Settled). Please fix the following, then try again:
Nothing was saved. If the family is only paying part of the bill today, choose Partial Payment instead.
Point the camera at the manufacturer barcode or COTC QR sticker.
On hand: 0 · Checked out: 0 · Available now: 0

| Employee Name: | Position: | ||
| Contact Number: | National ID: |
| Deceased: | |
| Responsible Party: | |
| Gross Contract Amount: | |
| Company Discount Applied: | |
| Net Contract Amount: | |
| Down Payment (upon signing): | |
| Outstanding Balance Due: |
| Step | Description | Amount | Timing |
|---|---|---|---|
| 1 | |||
| 2 | |||
| 3 |
Buying stock (supplies, consumables)? Use Inventory → Stock In instead — it records this same disbursement and adds the stock in one go. Entering it here as well would count the money twice.